Showing posts with label tutorials. Show all posts

Wednesday 28 October 2015

How To Create Different Network Profiles On Modern

Good day to you oldrafikki.com readers. If this is your first time, i hope you get what you came for and for the returning readers, thanks for your support cos you the reason we still here. Thanks a lot once again.      
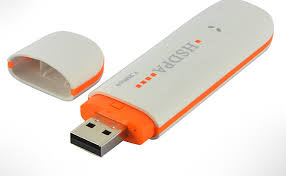
   A girl i know bought data from  OLDRAFIKKI DATA BUNDLES which offers cheap data at very reduced rates to subscribers on MTN, AIRTEL, GLO and ETISALAT and came complaining to me that her modern wasn't connecting. As it turned out, she was trying to use a cracked GLO modern to connect to the MTN network. Today, i am going to share with you what she should have done.
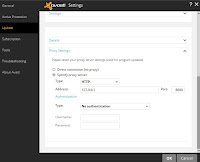
              She should have created a new network profile for the network she was trying to connect to and input the network settings in the space provided. To create a new profile in your 3G modern, go to OPTIONS>>PROFILE MANAGEMENT and Click on NEW.
               All you need to do now is to input the correct settings for the network you want to browse with and you will be able to connect without troubles. The network settings are listed below

  • MODERN SETTINGS FOR MTN

Profile Name:  Put the network name here for easy identification when choosing profiles
Access number / Dial up number :  *99#  
Username :  web
Password :  web
APN :  web.gprs.mtnnigeria.net
DNS Settings :  10.199.212.2
  • MODERN SETTINGS FOR GLO 

    Profile Name:  Put the network name here for easy identification when choosing profiles
    Access number / Dial up number :  *99#  
    Username : flat
    Password : flat
    APN : gloflat

    • MODERN SETTINGS FOR AIRTEL

      Profile Name:  Put the network name here for easy identification when choosing profiles
      Access number / Dial up number :  *99#  
      Username :internet
      Password :internet
      APN :internet.ng.airtel.com

    •  MODERN SETTINGS FOR ETISALAT

      Profile Name:  Put the network name here for easy identification when choosing profiles
      Access number / Dial up number :  *99#  
      Username :  leave blank
      Password :  leave blank
      APN :etisalat


      CLICK SAVE THEN SET AS DEFAULT TO START USING YOUR NEW PROFILE.
      Feel free to use the comment box if this post was helpful or if you have any problems  You can also post on the FORUM if you still have questions not related to this post and your questions will be answered by me or other blog readers

Tuesday 13 October 2015

How to Use The MTN Simple Server Cheat On Linux

Windows users have been rocking the MTN Simple Server Cheat for a Very long time and downloading what they want, when they want. I am going to show you how to use it on linux with this post. The procedure for linux is the same with windows but i will post the full procedure here for you linux users. The simple server given in the download link in this tutorial is already configured for MTN simple server cheat
  1. Download an already configured simple server for linux here 
  2. Extract simple server
  3. Change to the simple server directory and run simple server.pyc by typing the following code in your linux terminal          "python SimpleServer.pyc"
  4. You will see this if simple server is up and running 

    Use the comment box if you have problems with this tutorial or to let us know how helpful it was to you.

Tuesday 22 September 2015

This Connection is Not Trusted. ( What To Do ) Firefox

connection not trusted
Today i was trying to set up internet on a windows PC and i encountered a problem that i have not encountered before. Any time  i put in a web address, for facebook or google, i get an error message as shown in picture in image. There are a lot of reasons for this but we will discuss the most common and obvious in the course of this post.

Incorrect Date And Time

Incorrect date and time on your pc can result in error messages when trying to access secure web pages on the internet especially when doing so over a proxy connection. As it happened in my case i was using the MTN simple server browsing cheat on my PC . To correct this anomaly, i had to correct the date and time on my PC and the error messages stopped showing.

I hope this solves the problem. If error message still appears GO HERE 
Feel free to use the contact form at the bottom of the page if you have any contributions to this article, if you have something tech you will like to share with us. Your comments are also highly appreciated and welcome.


Saturday 15 August 2015

How To Change Your Android Phone IMEI To Blackberry IMEI

The fun thing about android is that you can tweak it almost any way you want. Android users can now use the GLO BIS plan just by changing their android phone IMEI to that of a blackberry.
To change your android phone IMEI, your android device has to be rooted.
Go here to see how to root your android device if you haven't done so.

First of all, you need to generate a blackberry IMEI to use on your android. Generating a blackberry IMEI is quite simple. All you need do is to download bbgen apk for android to generate your blackberry IMEI.
Download bbgen apk from here.
Run the apk on your android device to generate blackberry IMEI

Steps To Change Android IMEI to Blackberry

  1. backup your Android phone using ClockworkMod Recovery (CWM) should in case it get bricked. - See more at: http://www.shelaf.com/2014/06/get-glo-bis-3gb-of-1k-and-enjoying.html#sthash.z24rsuZg.dpuf
    Root your android phone Go here to see how to root your android phone if you haven't rooted it yet. 
  2. Before you begin changing the IMEI, backup your android phone using clockworkmod Recovery in case your android phone gets bricked.
  3. Download terminal emulator for android from google play store 
  4. Open the terminal emulator.
  5. . Download Terminal Emulator from Play Store
    3. Open Android Terminal Emulator
    4. Type SU then press ENTER button to get Superuser permmison
    3. After that, type this command then press ENTER buttonecho ‘AT+EGMR=1,7,”IMEI_NUMBER”‘ >/dev/pttycmd1
    or echo AT+EGMR=1*7*IMEI_1 >/dev/pttycmd1 - See more at: http://www.shelaf.com/2014/06/get-glo-bis-3gb-of-1k-and-enjoying.html#sthash.K8Ef0nc9.dpuf
    Type SU then press ENTER button to get superuser permission
  6. For single sim phones type this command then press ENTER         echo AT+EGMR=1*7*IMEI_1 >/dev/pttycmd1
  7. For dual sim phones type this command and press enter  echo ‘AT+EGMR=1,10, “IMEI_NUMBER” ‘ >/dev/pttycmd1
  8. Reboot your android and that is all. You have successfully changed your android phone IMEI
    echo AT+EGMR=1*7*IMEI_1 >/dev/pttycmd1
    backup your Android phone using ClockworkMod Recovery (CWM) should in case it get bricked. - See more at: http://www.shelaf.com/2014/06/get-glo-bis-3gb-of-1k-and-enjoying.html#sthash.z24rsuZg.dpuf
    backup your Android phone using ClockworkMod Recovery (CWM) should in case it get bricked. - See more at: http://www.shelaf.com/2014/06/get-glo-bis-3gb-of-1k-and-enjoying.html#sthash.z24rsuZg.dpuf
    backup your Android phone using ClockworkMod Recovery (CWM) should in case it get bricked. - See more at: http://www.shelaf.com/2014/06/get-glo-bis-3gb-of-1k-and-enjoying.html#sthash.z24rsuZg.dpuf
    backup your Android phone using ClockworkMod Recovery (CWM) should in case it get bricked. - See more at: http://www.shelaf.com/2014/06/get-glo-bis-3gb-of-1k-and-enjoying.html#sthash.z24rsuZg.dpuf

Monday 10 August 2015

Update Avast Program / Virus Definitions With Proxy

Update Avast Program / Virus Definitions With Proxy
avast proxy settings
If you have the Avast antivirus program then you will agree with me that the Avast antivirus is very good. If you don't have the avast antivirus you can download avast internet security + License key from here .

In case you are connecting to the internet through a proxy connection and you need to update your avast program or avast virus definitions, follow the simple steps below.


How to Configure Avast To Work With Proxy 

  1. Open your avast antivirus and go to settings
  2. Click on Update and scroll down
  3.  Click on proxy settings and put in your proxy server details
  4. You have successfully configured your avast antivirus to work with proxy
If you need to access the internet with proxy on an app without proxy settings, all you need to do is to configure full system proxy. Go here to see how to configure full system proxy.

Monday 3 August 2015

How to put on your hotspot in iPhone ios7 and above( final solution to ios7 and 8 hotspot issue)

many of the ios8 users have met have complained about not finding the HOTSPOT feature in ios 8 and therefore some have even decided that it their iphone came without an hotspot capability. some searched the internet for possible solutions on how to put on the hotspot feature in iphone5,6 and some other ios8 device.
but we here at oldrafikki do not believe that apple just took all your money and gave you an iphone without hotspot, so we will show you why the hotspot feature is missing in your new iphone and we will also show you how to put on hotspot in your new iphone without having to leave the cozzy comfort of your bed, of course that is one of the many benefits of following oldrafikki, we show you the latest tricks so you can boast to your friends that you are computer wizard, dont worry we know you have been doing that and we are proud of you.

WHY IOS8 DEVICES SOMETIMES HAVE MISSING HOTSPOT FEATURES.
in order for you to use hotspot on your iphone5 or other ios8 devices, your carrier( your network provider) must have sent you the APN, PASSWORD AND USERNAME for your cellular data network, sometimes this is not always the case, for some reasons unknown to us some network providers may not send you all the required settings and information your phone need to power it hotspot feature. that is why the hotspot feature is missing in some iphone5 or ios8 devices

SETTING UP HOTSPOT APN IN iPHONE5 OR OTHER IOS8 DEVICES.

 to start using your hotspot ios 8 your hotspot must have its cellular data profile complete, you can do that by going to SETTINGS on your iphone device.


then select CELLULAR this will take you to the cellular network settings menu.


select the cellular data network option


and it will take you to the cellular data network APN, USERNAME & PASSWORD settings menu. this is where we will input the APN information to enable the hotspot feature on your device.


WE WILL ADD THIS INFORMATION TO THE SPECIFIED AREAS.
1. CELLULAR DATA: 
apn= (leave this area empty)
username= web
password= iphone
2.MMS:
apn= (leave this area empty)
username= web
password= iphone
(leave the remaining area empty.)
3.PERSONAL HOTSPOT:
apn= (leave this area empty)
username= web
password= iphone

after making this changes go to setting and wait for your personal hotspot feature to appear, you may also restart your iphone if it is taking too long to appear. when it does appear it is supposed to look like this on your iphone settings menu.


Follow Us On Facebook

Categories